
Background story (that you can safely ignore)
One of my side gigs is at a 501(c)(3) Non-profit organization. It is never easy for Non-profit and we are always trying to save a few bucks here and there. We have been using Quickbooks online to deal with our accounting needs, but that is more than $1,000 a year. In searching for a cheaper solution, here is a guide created for this purpose and probably could save us that $1,000 each year. But you can use this guide to setup RDWeb for your home lab or any company.
If you are willing to sacrifice speed and performance, this setup can be free for the first year and then less than $50 the years follow. (As long as AWS does not increase their prices) (To keep it free, you will probably need to shut down the servers during off business hours to keep the usage within the 750 hours /month limit) On the other hand, if you also have the 501(c)(3) status, you can join Techsoup.org and get products/services at a discounted price. Upgrading to Techsoup Boost (for the price of $79 / year) will get you Quickbooks Premier 2019 for free, as well as a bigger discount on AWS credits. You can get $2,000 AWS credit for just $80. Techsoup Boost sent me a $25 promo code to use for my first purchase, making it $79 + $80 – $25 = $134 for this whole setup, and I can use the $2,000 credits to size up my instances on AWS.
I am setting up RDWeb to launch Quickbooks to make it easier for our account to access the desktop version. For RDweb, we will also need to purchase 1 RDS CAL license if we end up going with this approach. Another option is to have them RDP to the AWS instance directly. If that’s the case, you can just get a AWS workspace instance and install Quickbooks Desktop version there.
Requirements:
- AWS account. You can register for a free tier, and apply the $2,000 AWS credit. (if you are a nonprofit)
- 3 windows EC2 instances. I built my environment with the free tier (t2.micro with 30 GB of storage)
- A 3rd party SSL Certificate (I did not get this)
- RDS CAL Licenses
1st EC2 instance (TESTDC01) – We will use the Server 2019 Base AMI (t2.micro with 30GB storage to keep it free) and install the Active Directory Domain Services role. Since we only have 3 servers, we will also use the DC for RDS licensing. After configuring this server as a Domain Controller, we will create a new forest. I will call this forest corp.rdtest.com for the purpose of this guide.
2nd EC2 instance (TESTQB01) – We will again use the Server 2019 Base AMI (t2.micro with 30GB storage) and join to the corp.rdtest.local domain. This will be the host server for our Quickbooks application.
3rd EC2 instance (TESTRD01) – We will again use the Server 2019 Base AMI (t2.micro with 30GB storage) and join to the corp.rdtest.local domain.
The Guide
We will be doing everything from the TESTRD01 server. Go ahead and connect to that server first.
Once there, run Powershell as an administrator. Put in
Enter-Pssession -ComputerName "testdc01.corp.rdtest.com"

This will initiate a remote PowerShell Session to our Domain Controller, so we are able to install the role remotely. (This assumes the account you are using to logon to TESTRD01 is a Domain Admin) (Also, you may have to Enable PowerShell Remoting when you first setup your servers. This can be done with the Enable-PSRemoting Command on each of the servers.)
Once the Remote PowerShell Session has been established
Get-WindowsFeature -Name "*RDS*"
will get you a list of Features that contains the word “RDS”.
Install-WindowsFeature -Name “RDS-Licensing” -IncludeManagementTools -Restart
will get the RD Licensing role installed on TESTDC01, along with the management tool.

The -Restart parameter will restart the server for you after the installation. In this case, the installation does not require a restart.

Now that we have the Licensing Role installed, type in “exit” to exit out from the remote PowerShell Session. We will then type in
New-RDSessionDeployment -ConnectionBroker “testrd01.corp.rdtest.com” -WebAccessServer “testrd01.corp.rdtest.com” -SessionHost “testqb01.corp.rdtest.com”
This is going to take awhile because we are also installing the roles to the servers. This will also restart testqb01 to finish installing the session host role.

Once the deployment has been completed, you can establish a remote PowerShell Session to Testqb01 to make sure that it is installed correctly (I am only doing this to show you, but you can probably skip this step. The deployment command will probably return errors if it wasn’t complete properly.)

Next, we will need to go the testdc01 to activate the licensing server in the GUI. Once that is out of the way, go back to testrd01 to continue the setup. Lets configure testdc01 as our licensing server in the deployment.
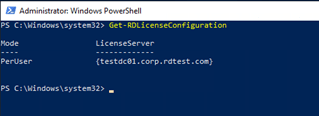
Set-RDLicenseServer -LicenseServer “testdc01.corp.rdtest.com” -Mode PerUser -ConnectionBroker “testrd01.corp.rdtest.com”

You can run Get-RDLicenseServer to confirm that the License Server has been configured.
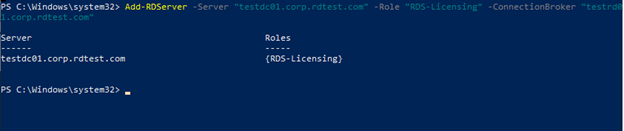
To add testdc01 as the licensing server to the Deployment, type in the following command –
Add-RDServer -Server “testdc01.corp.rdtest.com” -Role “RDS-Licensing” -ConnectionBroker “testrd01.corp.rdtest.com”
Next, we will need to get the RDS Gateway role installed on testrd01.
Install-WindowsFeature -Name “RDS-Gateway” -IncludeManagementTools -Restart
and again, this role does not require a restart.

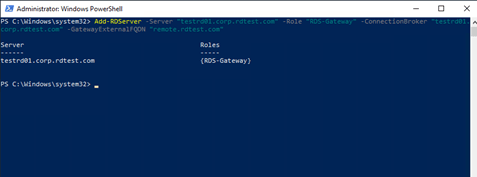
To add testrd01 as the Gateway to the Deployment –
Add-RDServer -Server “testrd01.corp.rdtest.com” -Role “RDS-Gateway” -ConnectionBroker “testqb01.corp.rdtest.com” -GatewayExternalFQDN “remote.rdtest.com”

Once completed, it will show the new configuration
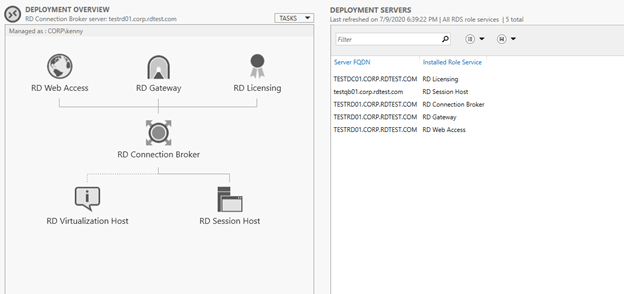
If you go to server manager and check the deployment now, you will see that all the roles have been configured. And all of them are grayed out.
What is left to do is to create and install the SSL to the Gateway and to Deploy the Collection and the apps.
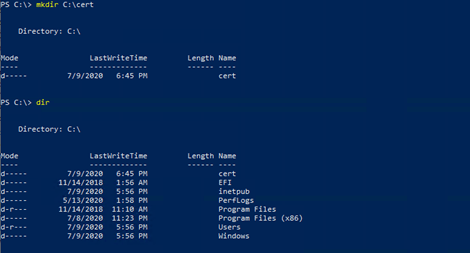
Let us create a folder “Cert” under C drive first.
Next, type in
$Password = ConvertTo-SecureString -String “123456abc” -AsPlainText -Force
This will put the password “123456abc” to the variable $Password.
New-RDCertificate -Role “RDPublishing” -DnsName “remote.rdtest.com” -Password $Password -ExportPath “c:\cert\remote.rdtest.com.pfx” -ConnectionBroker “testrd01.corp.rdtest.com”
This will create a self-signed SSL and save it to C:\cert with the name remote.rdtest.com.pfx and all the information for this deployment.
We will import the same SSL to the other three roles.
 Set-RDCertificate -Role “RDRedirector” -ImportPath “C:\cert\remote.rdtest.com.pfx”  -Password $Password -ConnectionBroker “testrd01.corp.rdtest.com”
 Set-RDCertificate -Role “RDWebAccess” -ImportPath “C:\cert\remote.rdtest.com.pfx”  -Password $Password -ConnectionBroker “testrd01.corp.rdtest.com”
 Set-RDCertificate -Role “RDGateway” -ImportPath “C:\cert\remote.rdtest.com.pfx”  -Password $Password -ConnectionBroker “testrd01.corp.rdtest.com”

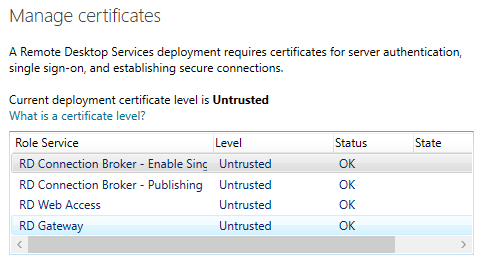
If you open the Deployment properties now, you will see that all the Certificates have been imported. (you will need to refresh server manager if you had it opened all this time)
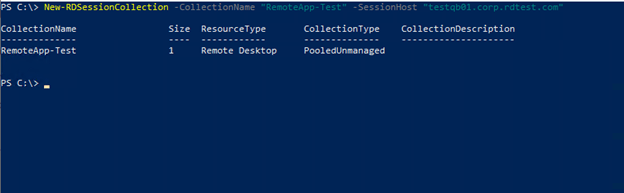
To deploy a new Collection,
New-RDSessionCollection -CollectionName "RemoteApp-Test" -SessionHost "testqb01.corp.rdtest.com"
It will create a new Collection with the name “RemoteApp-Test”. To deploy calculator and Paint to the collection –
New-RDRemoteApp -Alias Paint -DisplayName Paint  -FilePath "C:\windows\system32\mspaint.exe" -ShowInWebAccess 1 -CollectionName "RemoteApp-Test" -ConnectionBroker "testrd01.corp.rdtest.com"
New-RDRemoteApp -Alias Calculator -DisplayName Calculator  -FilePath "C:\windows\system32\calc.exe" -ShowInWebAccess 1 -CollectionName "RemoteApp-Test" -ConnectionBroker "testrd01.corp.rdtest.com"


Our deployment is now already working internally. We would need to setup the zone to redirect traffic to testrd01 to remote.rdtest.com
Establish a remote PowerShell Session to testdc01 again and run
Add-DnsServerPrimaryZone -Name “remote.rdtest.com” -ReplicationScope “Forest” -PassThru

Add-DnsServerSourceRecordA -Name “remote.rdtest.com” -ZoneName “remote.rdtest.com” -IPv4Address “172.31.40.177” -AlloUpdateAny
(make sure you put in the Private IP for your testrd01 here.)

And if we do a Ping to remote.rdtest.com now, you will get a respond and can now access RDWeb with remote.rdtest.com (assuming you enabled ping in your firewall.)


Since what’s left is creating the GPO and configure HTTP redirection to /RDWeb, and is not strictly RDS related, I will leave them out from this guide. We now have a working RDWeb environment. We will not touch on external access because it only requires manually setup that the end user needs to follow.
Have fun!
